Table of contents
Open Table of contents
What’s etcd?
- distributed and HA data store (key-value database)
- k8s uses as a meta store
Why some are not happy about etcd?
- Scalability issues for large k8s deployments (100s or 1000s)
- the state of the etcd community
kine
- Run Kubernetes on MySQL, Postgres, sqlite, dqlite, not etcd. Click here for the Github repo
Installation of k3s with postgres datastore:
curl -sfL https://get.k3s.io | sh -s - server \
  --token=SECRET \
  --datastore-endpoint="postgres://postgres:postgres@127.0.0.1:5432/postgres"
Before running above command the postgres must be setup. For setup follow this:
https://www.digitalocean.com/community/tutorials/how-to-install-and-use-postgresql-on-rocky-linux-8
After the setup of postgres:
check the connection with this command so that we can run the above k3s command:
psql "postgres://postgres:postgres@127.0.0.1:5432/postgres"
😀 If the above command works, now we are ready to install the k3s with postgres datastore endpoint.
Remember:
If we face this issue:
psql: error: connection to server at "127.0.0.1", port 5432 failed: FATAL: Ident authentication failed for user "postgres"
Solution:
sudo vi /var/lib/pgsql/15/data/pg_hba.conf- Look for the following lines:
local all postgres ident
Change ident to md5:
local all postgres md5
Also, update any lines that look like this:
host all all 127.0.0.1/32 ident
Change ident to md5:
host all all 127.0.0.1/32 md5
postgres=# select count(*) from kine;
 count
-------
  2563
(1 row)
postgres=# select id, name from kine order by id desc limit 5;

  id  |                           name
------+-----------------------------------------------------------
 2764 | /registry/masterleases/192.168.29.129
 2763 | /registry/leases/kube-system/k3s-cloud-controller-manager
 2762 | /registry/leases/kube-node-lease/redhat
 2761 | /registry/leases/kube-system/kube-scheduler
 2760 | /registry/leases/kube-system/k3s
(5 rows)
Till now we are running vanilla postgres, it cool that we can use kine to connect vanilla postgres or mysql. But those two databases are designed to work on single server environment, they are not scalable as etcd, they’re not as highly available as etcd if you want to make Postgres scalable or highly available you need to use additional extensions and solutions from the postgres ecosystem.
One of the solution is yugabyteDB
For the yugabyte datastore endpoiint
curl -sfL https://get.k3s.io | sh -s - server \
  --token=SECRET \
  --datastore-endpoint="postgres://yugabyte:yugabyte@192.168.29.129:5433/yugabyte?sslmode=disable"
psql -h 192.168.29.129 -p 5433 -U yugabyte
join agent node:
 curl -sfL https://get.k3s.io | sh -s - agent \
  --server https://192.168.29.129:6443 \
  --token K1013d7857d2f207d981276a78986c5aee57414ed4f1578232aef79e961871728a9::server:SECRET
Note:
Destroy a local cluster
If you are running YugabyteDB on your local computer, you can’t run more than one cluster at a time. To set up a new local YugabyteDB cluster using yugabyted, first destroy the currently running cluster.
To destroy a local single-node cluster, use the destroy command as follows:
./bin/yugabyted destroy
To destroy a local multi-node cluster, use the destroy command with the --base_dir flag set to the base directory path of each of the nodes. For example, for a three node cluster, you would execute commands similar to the following:
./bin/yugabyted destroy --base_dir=${HOME}/var/node1
./bin/yugabyted destroy --base_dir=${HOME}/var/node2
./bin/yugabyted destroy --base_dir=${HOME}/var/node3
./bin/yugabyted destroy --base_dir=$HOME/yugabyte-2.25.0.0/node1
./bin/yugabyted destroy --base_dir=$HOME/yugabyte-2.25.0.0/node2
./bin/yugabyted destroy --base_dir=$HOME/yugabyte-2.25.0.0/node3
Create a multi-zone cluster
secure method: visit doc for this to setup tls. Click here
Insecure method for testing purpose only :
first node:
Start the first node by running the yugabyted start command, passing in the --cloud_location and --fault_tolerance flags to set the node location details.
Set the --backup_daemon flag to true if you want to perform backup and restore operations.
./bin/yugabyted start --advertise_address=192.168.29.128 \
    --join=192.168.29.129 \
    --cloud_location=aws.us-west-1.us-west-1b \
    --fault_tolerance=zone
Second node:
Start the second and the third node on two separate VMs using the --join flag.
Set the --backup_daemon flag to true if you want to perform backup and restore operations.
./bin/yugabyted start --advertise_address=192.168.29.128 \
    --join=192.168.29.129 \
    --cloud_location=aws.us-west-1.us-west-1b \
    --fault_tolerance=zone
Third Node:
./bin/yugabyted start --advertise_address=192.168.29.132 \
    --join=192.168.29.129 \
    --cloud_location=aws.us-north-1.us-north-1b \
    --fault_tolerance=zone
After starting the yugabyted processes on all nodes, configure the data placement constraint of the cluster as follows:
./bin/yugabyted configure data_placement --fault_tolerance=region

The preceding command automatically determines the data placement constraint based on the --cloud_location of each node in the cluster. If there are three or more regions available in the cluster, the configure command configures the cluster to survive at least one availability region failure. Otherwise, it outputs a warning message.
The replication factor of the cluster defaults to 3.
You can set the data placement constraint manually and specify preferred regions using the --constraint_value flag, which takes the comma-separated value of cloud.region.zone:priority. For example:
./bin/yugabyted configure data_placement \
    --fault_tolerance=region \
    --constraint_value=aws.us-east-1.us-east-1a:1,aws.us-west-1.us-west-1a,aws.us-central-1.us-central-1a:2
This indicates that us-east is the preferred region, with a fallback option to us-central.
You can set the replication factor of the cluster manually using the --rf flag. For example:
./bin/yugabyted configure data_placement \
    --fault_tolerance=region \
    --constraint_value=aws.us-east-1.us-east-1a,aws.us-west-1.us-west-1a,aws.us-central-1.us-central-1a \
    --rf=3
we can run this sql command to inspect if there is any error:
First login to yugabyte
psql -h 192.168.29.129 -p 5433 -U yugabyte
and then:
select id, name from kine order by id desc limit 5;
it will give output as this:

Note: we can run \watch to keep watching.
When everything goes well, we can open the dashboard to see if our configuration working properly as below:
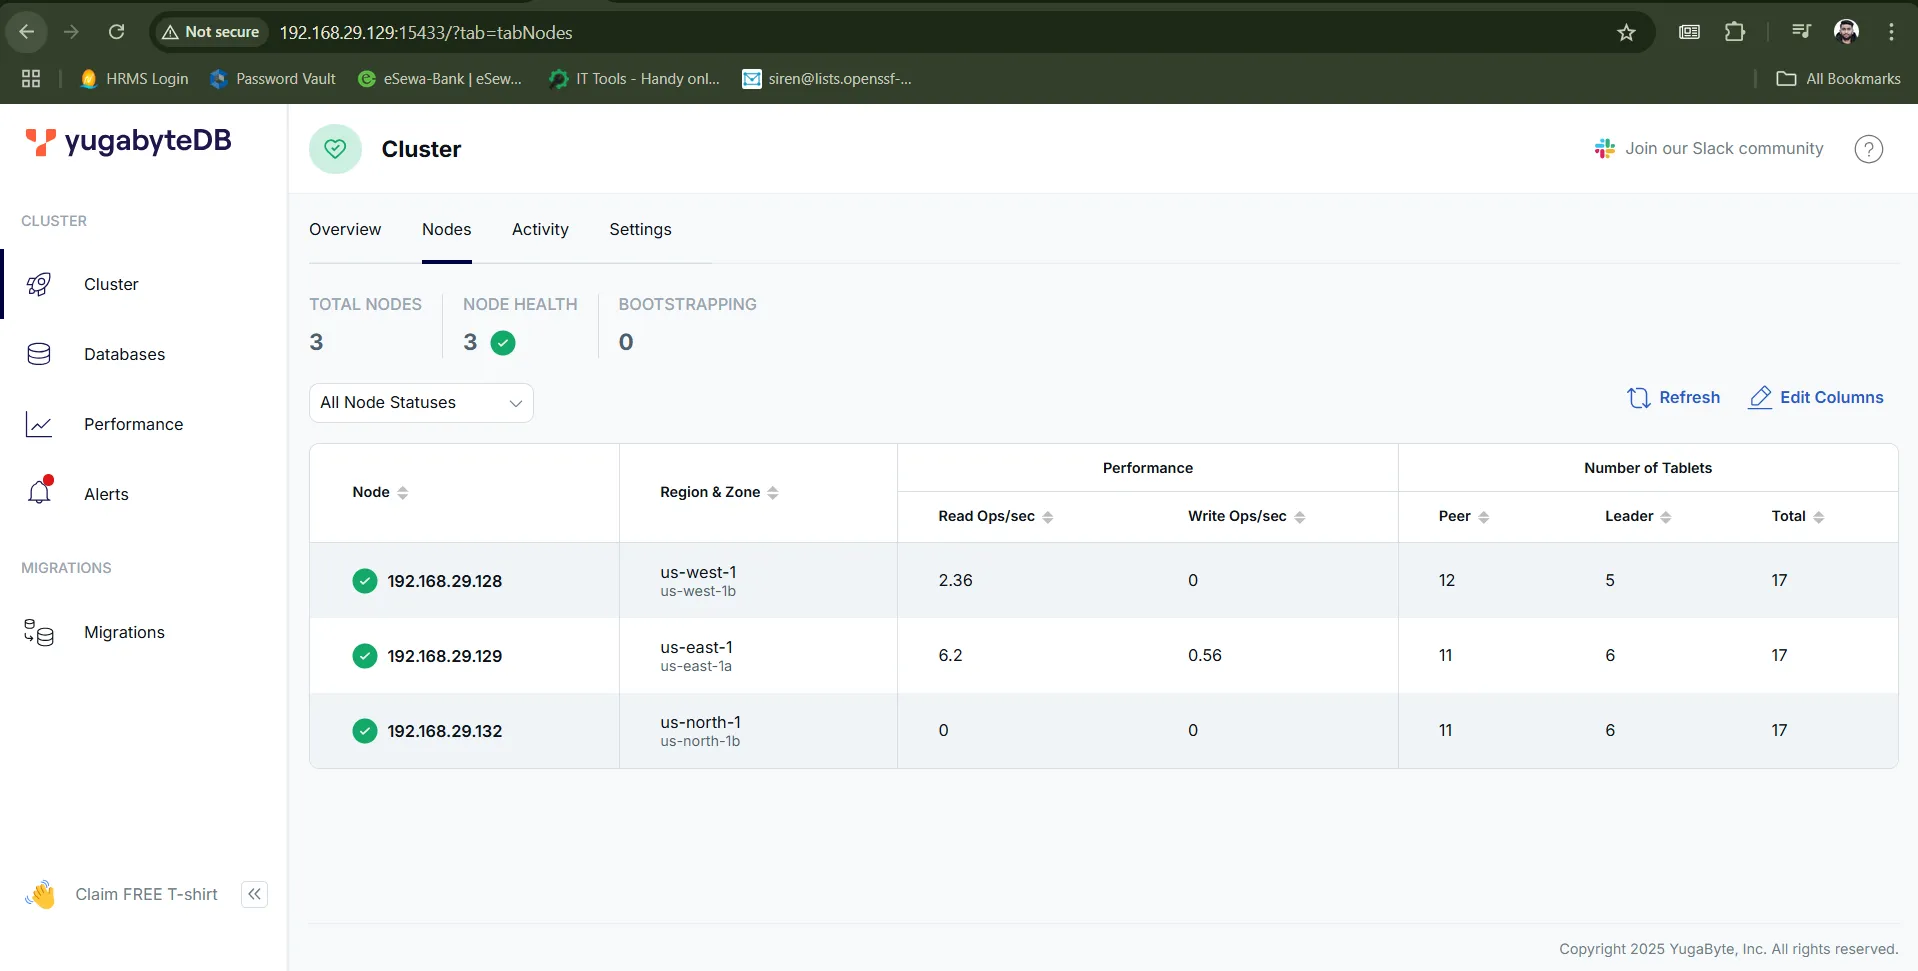
Now, we will deploy the simple application in our kubernetes. For example simple nginx deployment as below:
kubectl create deployment nginx --image=nginx --port=80 --namespace=default
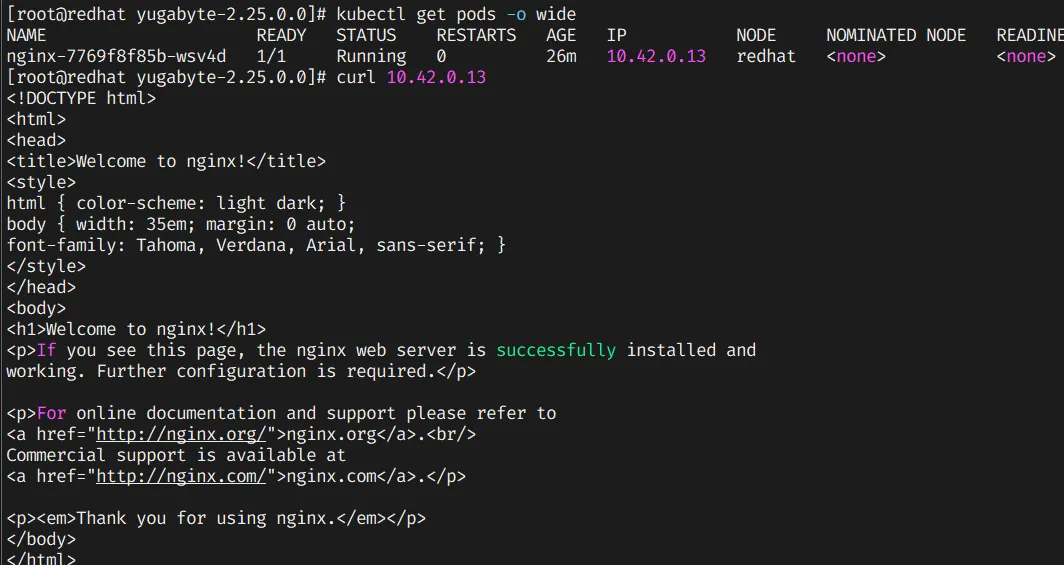
we will curl the pod along with the pod ip as show below:
Everything is working perfectly. Now we will shutdown one VM to see if the application is HA or not.
after shutdown, in the UI we can see there is an error like this:
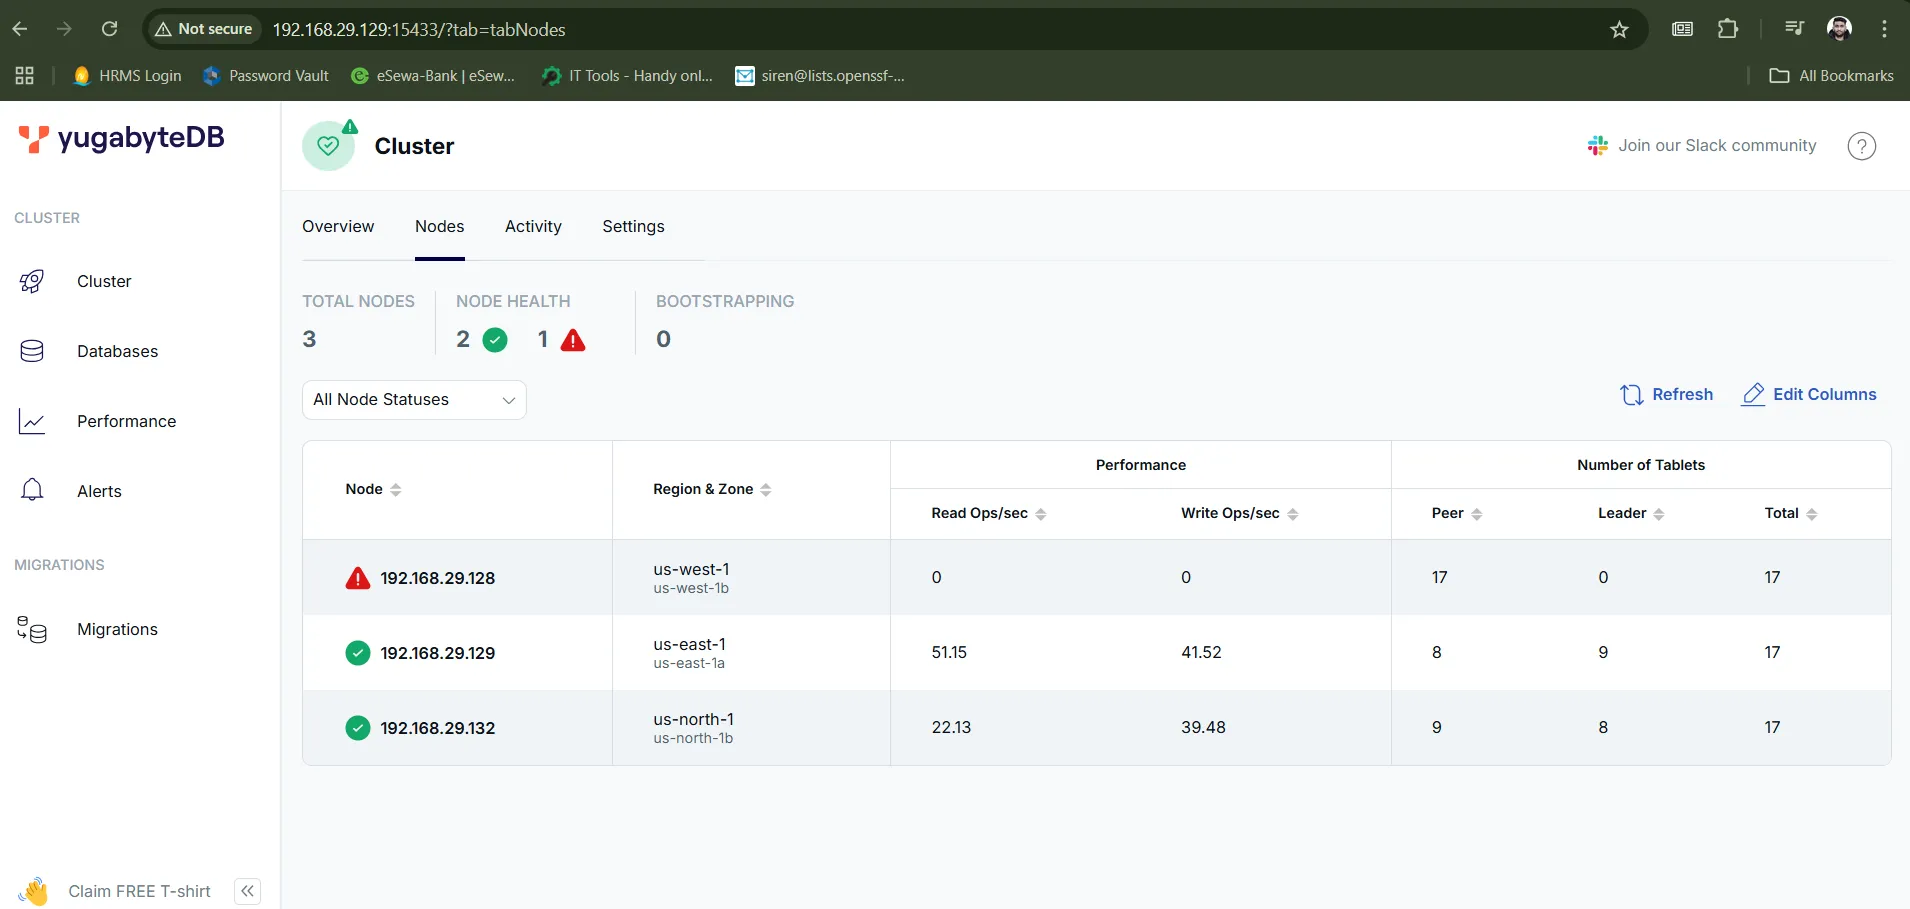
In the above screenshot we can see that the node: 192.168.29.128 is down. But our application must be running perfectly.
as we run this command before
./bin/yugabyted configure data_placement --fault_tolerance=region
The preceding command automatically determines the data placement constraint based on the --cloud_location of each node in the cluster. If there are three or more regions available in the cluster, the configure command configures the cluster to survive at least one availability region failure. Otherwise, it outputs a warning message.
and we will curl the pod along with its IP:
curl 10.42.0.13:80
we get same output:
and thats all how yugabyte works 😀
Followed this doc: yugabyted reference
Reference of this post:
[Youtube Video] https://www.youtube.com/watch?v=VdF1tKfDnQ0